This post may contain affiliate links which won’t change your price but will share some commission.

Marble cake is a wonderful old-fashioned baked good, as pretty as it is delicious. The idea of marbling two different colored batters into a cake originated in nineteenth century Germany, then made its way to America with German immigrants before the Civil War. Marble cake has a Jewish history as well… in fact, the first American recipe for marble cake showed up in a Jewish cookbook!
Here is my favorite method for marbling cake. It produces a nice, even marbling result, and it’s really simple. It will work with any marble cake recipe, as long as the recipe has two different batter colors. Give it a try! 🙂
For my Marble Cake recipe, click here.
How to Marble a Cake
Learn how to marble a cake using two different colored batters, a checkerboard pattern, and a knife.
PRINT RECIPE
Email Me RecipesServings: 1 cake
Ingredients
- 1 light colored cake batter
- 1 dark colored cake batter
NOTES
You will also need: baking pan for cake batter, large spoon, butter knife.
Instructions
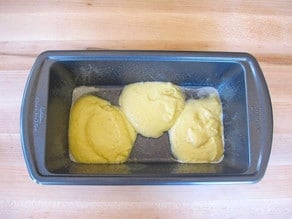
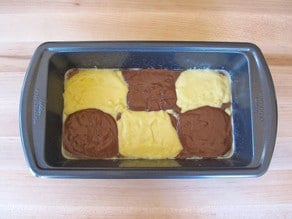
- Place your colored cake batters near your baking pan. Take 1/3 of the first colored batter and scoop it with a large spoon into your pan in a down-up-down pattern. If you're using a small loaf pan (as shown here), use three large dollops of batter. If you're using a round tube or bundt pan, drop dollops of batter in the same pattern--down, up, down-- all the way around the pan.

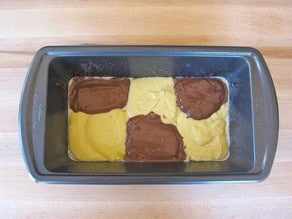
- Take 1/3 of your second colored batter. Scoop a dollop of the batter into each of the empty spaces to create a rough checkerboard pattern on the base of the pan. 1/3 of your total batter should be used at this point.
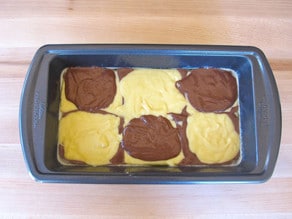
- With the second 1/3 of the batter, create a second checkerboard pattern on top of the first. Alternate colors-- meaning, if a light colored square is on the bottom, put a dark colored square on top.
- Repeat the pattern for a third and final layer with all the remaining batter. You should have three checkerboard layers in your baking pan now.
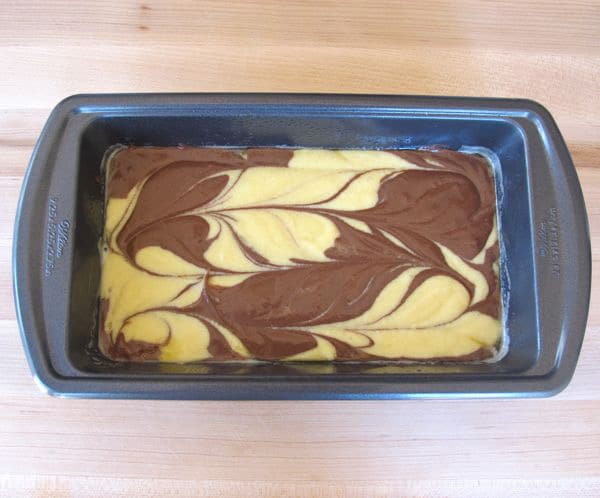
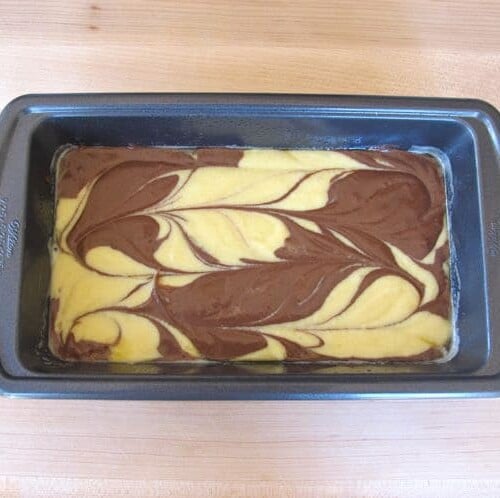
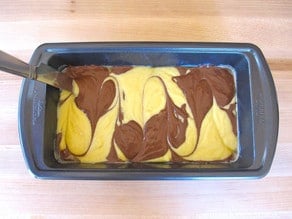
- Take your butter knife and swirl it through the batter, making rounded vertical zig-zags from one side of the pan to the other.
- Wipe the excess batter from the knife. Repeat the swirling pattern in the opposite direction. If you're using a loaf pan, make long horizontal swirls. If you're using a round tube or bundt pan, swirl opposing zig-zags all the way around the pan to create a chain shaped swirl.Resist the urge to make lots and lots of swirls-- the more you swirl, the less the cake will look marbled, and the more it will look like a mish-mosh when you slice it.
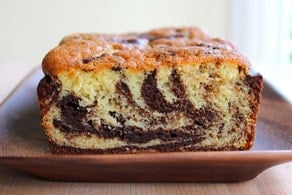
- Now your cake is marbled and ready to bake! When it's baked, cooled, and sliced, you'll see nice, evenly marbled patterns. Your cake will have its own unique variations. That's what make marble cake fun... you never know exactly what it will look like inside! 🙂 For my marble cake recipe, click here.


Nutrition
Nutrition Facts
How to Marble a Cake
Amount Per Serving
Calories 1902
Calories from Fat 126
% Daily Value*
Fat 14g22%
Saturated Fat 8g50%
Sodium 3763mg164%
Potassium 242mg7%
Carbohydrates 426g142%
Fiber 6g25%
Sugar 223g248%
Protein 19g38%
Calcium 1091mg109%
Iron 10.7mg59%
* Percent Daily Values are based on a 2000 calorie diet.

tried this recipe?
Let us know in the comments!
Note: Nutrition facts above refer to yellow cake batter for 1 whole 9-inch cake.


This is so confusing because it doesn’t say how long to bake it or if it’s okay to use a regular rectangle pan
Hi Jess,
Tori’s assistant Ashley here. This post is just a tutorial for marbling a loaf cake. The full recipe, with baking instructions, can be found here: https://toriavey.com/marble-cake/
Always wanted to learn how to marble a cake and now that i know i just cant wait to try and make one.